
Adding a trolling motor to your kayak does not mean buying an expensive mount. A DIY kayak trolling motor mount saves money and fits almost any kayak design. You control the size, shape, and placement to match your exact setup.
Only a few basic materials go into this project. PVC pipe, a plywood board, and some bolts and screws are enough to build a strong mount. Most builders finish the job in a few hours using simple tools like a saw and drill.
Both rigid and inflatable kayaks are covered below. Rigid kayak owners can follow the full PVC-and-plywood method. Owners of an inflatable kayak setup will find separate tips further down, since their build needs a different approach.
Is a DIY Trolling Motor Mount Worth It
A store-bought kayak trolling motor mount often costs 60 to 150 dollars. A DIY mount can cost as little as $15 to $30 with basic materials.
- Lower cost: Store-bought mounts cost far more than PVC pipe, plywood, and bolts bought at any hardware store.
- Custom fit: You build the mount to match your exact kayak model, motor size, and weight needs.
- No drilling required: The PVC method uses existing rod holders, so your kayak stays free of new holes.
- Extra features: You can add storage space or a battery holder, something most store-bought mounts skip.
- Hands-on satisfaction: Building the mount yourself gives a sense of pride and control over the final result.
Building your own mount is a simple way to save money without losing quality. You get a setup made for your kayak, not a generic one.
Materials and Tools You Need
Building a DIY kayak trolling motor mount takes only a few basic items. Most materials and tools are cheap and easy to find at any hardware store.
| Materials | Tools |
|---|---|
| PVC pipe (1.5 inch diameter) | Measuring tape |
| Plywood or aluminum board | Hand saw |
| Bolts and screws | Drill |
| Waterproof sealant (optional) | Gloves |
Most tools listed above are common shop items, so you may already have them at home.
How to Build a DIY Kayak Trolling Motor Mount
Follow these five steps to build a strong, custom trolling motor mount for your kayak. Each step uses simple tools and basic materials, so no advanced skills are needed.
Step 1: Position the PVC Pipes in the Rod Holders
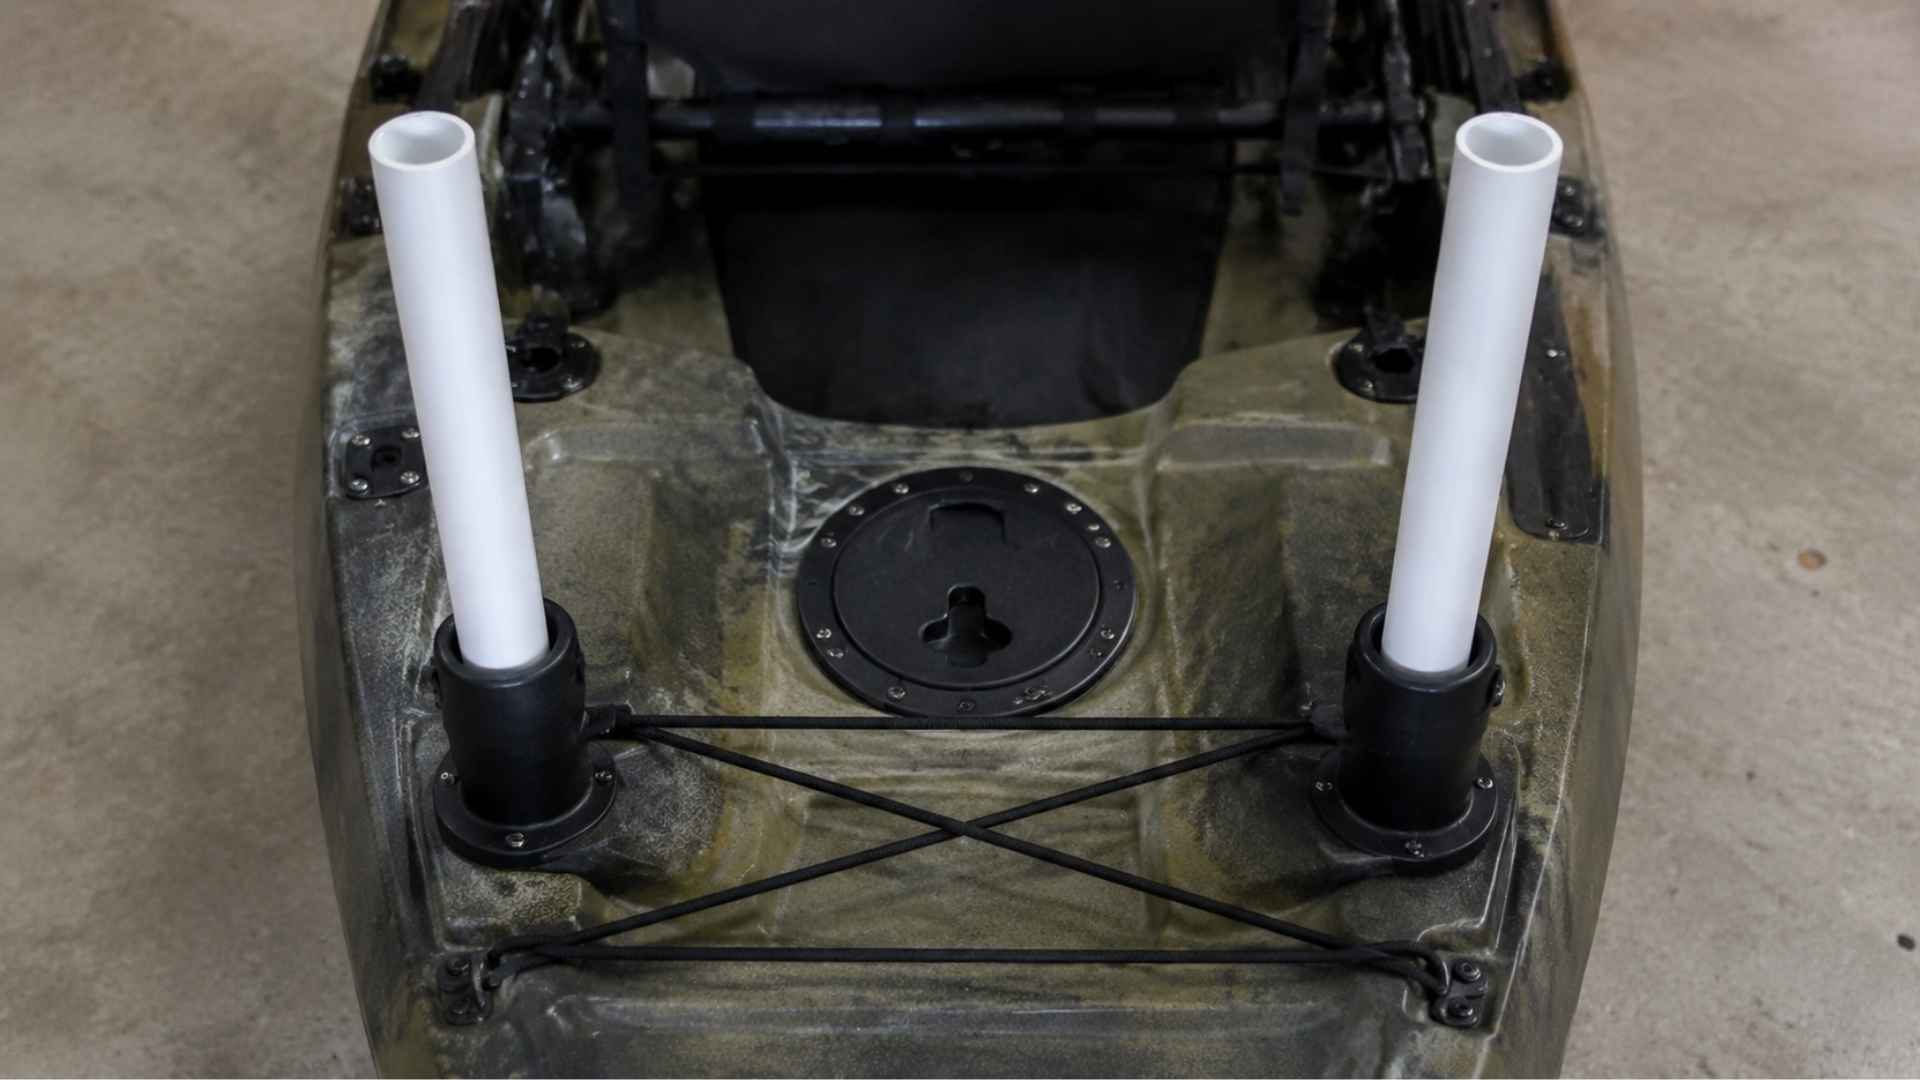
Place your two PVC pipes into the rod holders at the back of your kayak. Make sure they sit up straight and firm. If the pipes feel loose, slide a smaller-diameter conduit inside each one for added strength.
This step sets the base for your entire mount, so take time to get the placement right before moving forward.
Materials note: Standard white PVC, known as schedule 40, works fine for most builds. If you want the ability to fine-tune the angle before locking everything in place, schedule 80 PVC comes with threaded fittings instead of the usual slip-and-glue joints, which makes small adjustments much easier during the build.
Step 2: Measure and Mark the Board
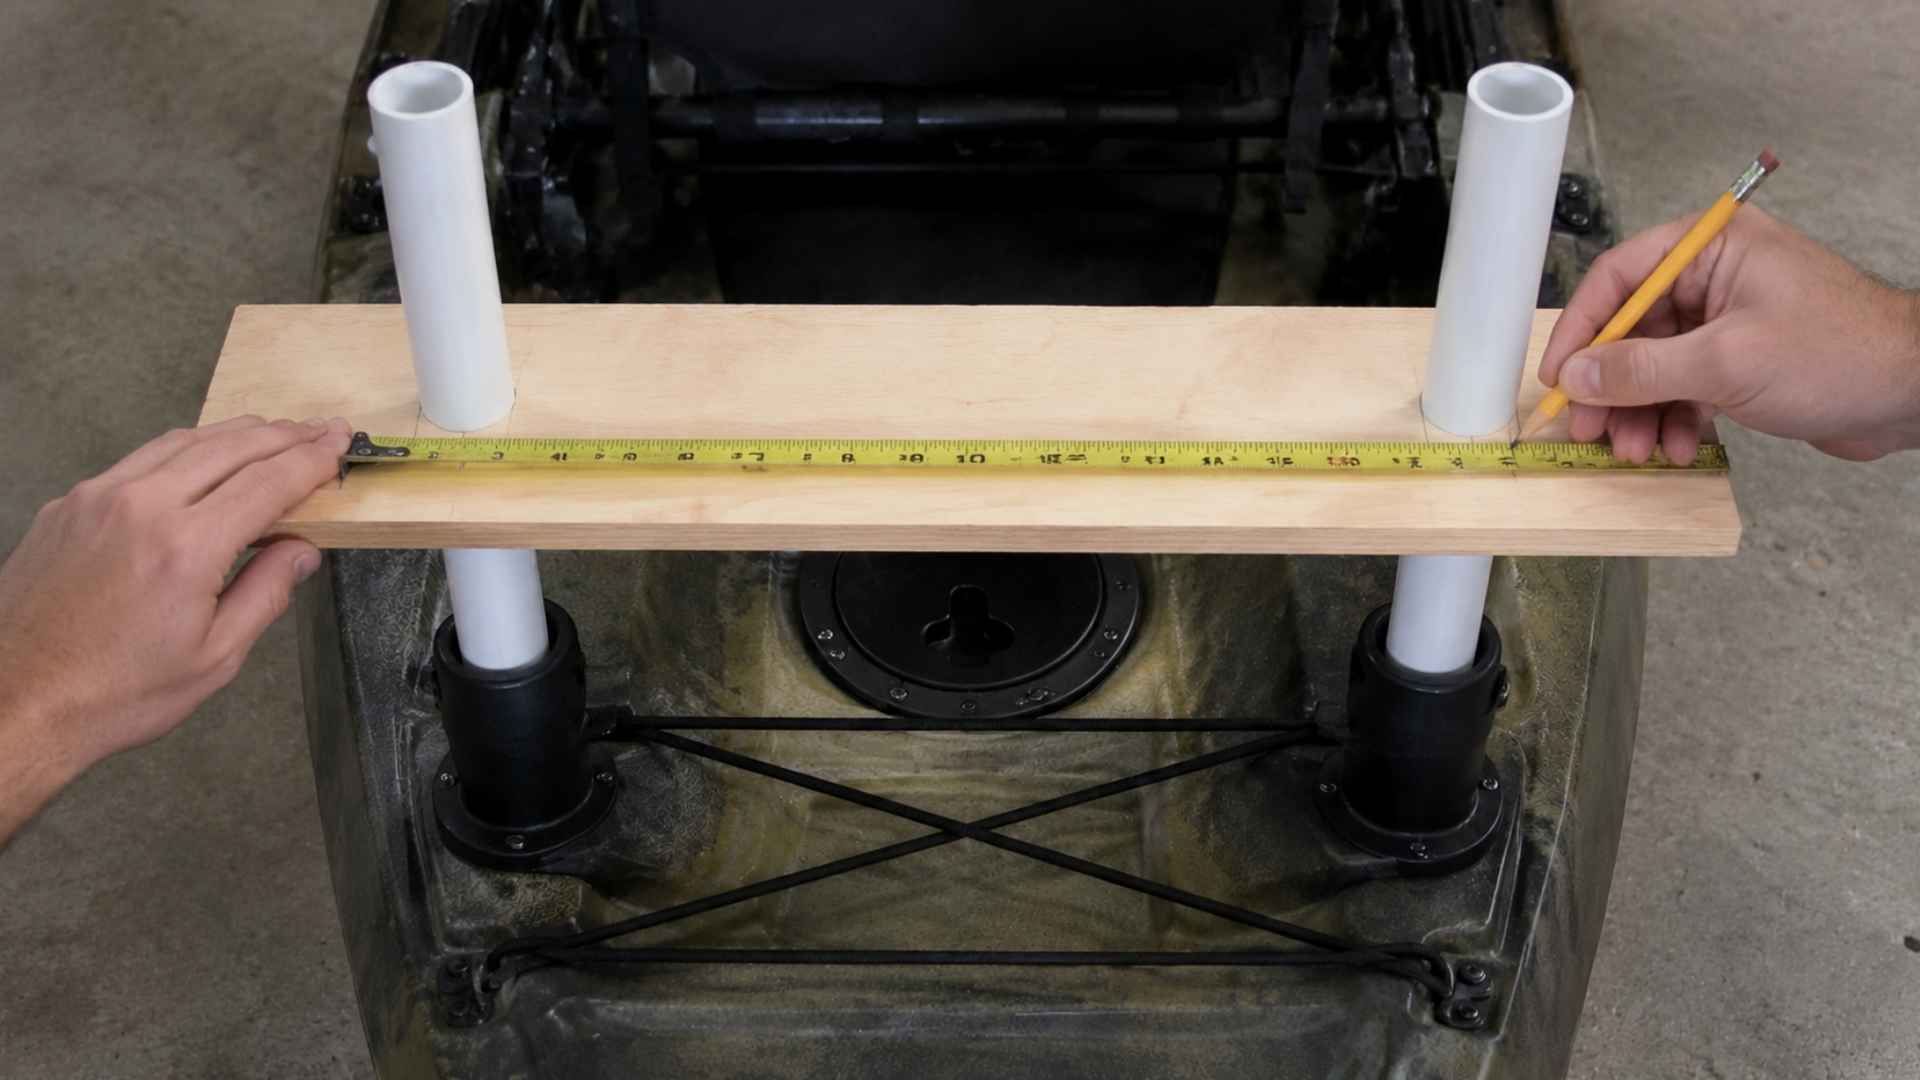
Lay your plywood or aluminum board across the back of the kayak. Measure the exact length needed so the board reaches both PVC pipes with a little extra length sticking out.
This extra space keeps the motor prop clear of the kayak when raised. Mark the board clearly with a pencil before cutting.
Step 3: Cut the Board to Size
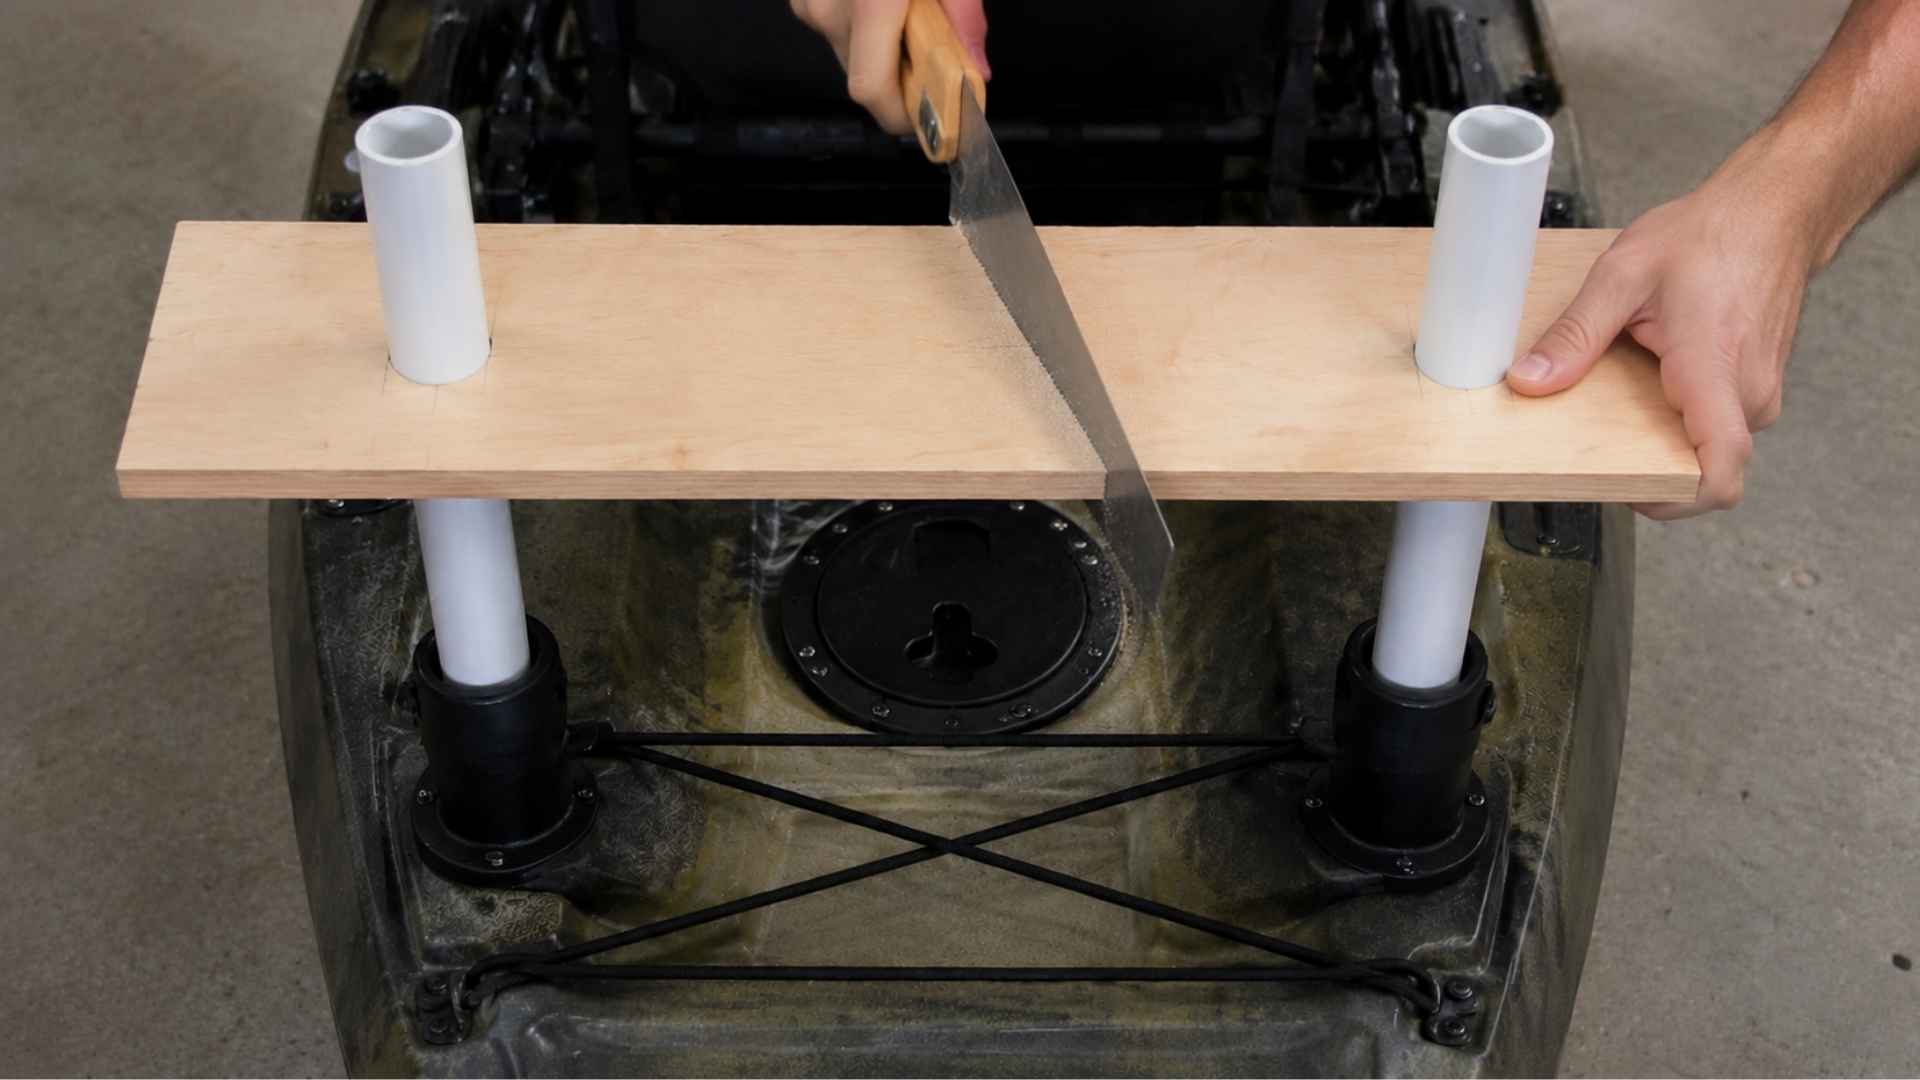
Use a hand saw to cut the board along your marked line. Cut slowly and keep the edge straight for a clean fit. A rough or crooked cut can affect how well the board sits on the pipes later.
Sand down any sharp edges once the cut is done, so the board is safe to handle.
Step 4: Drill and Attach the Board to the Pipes
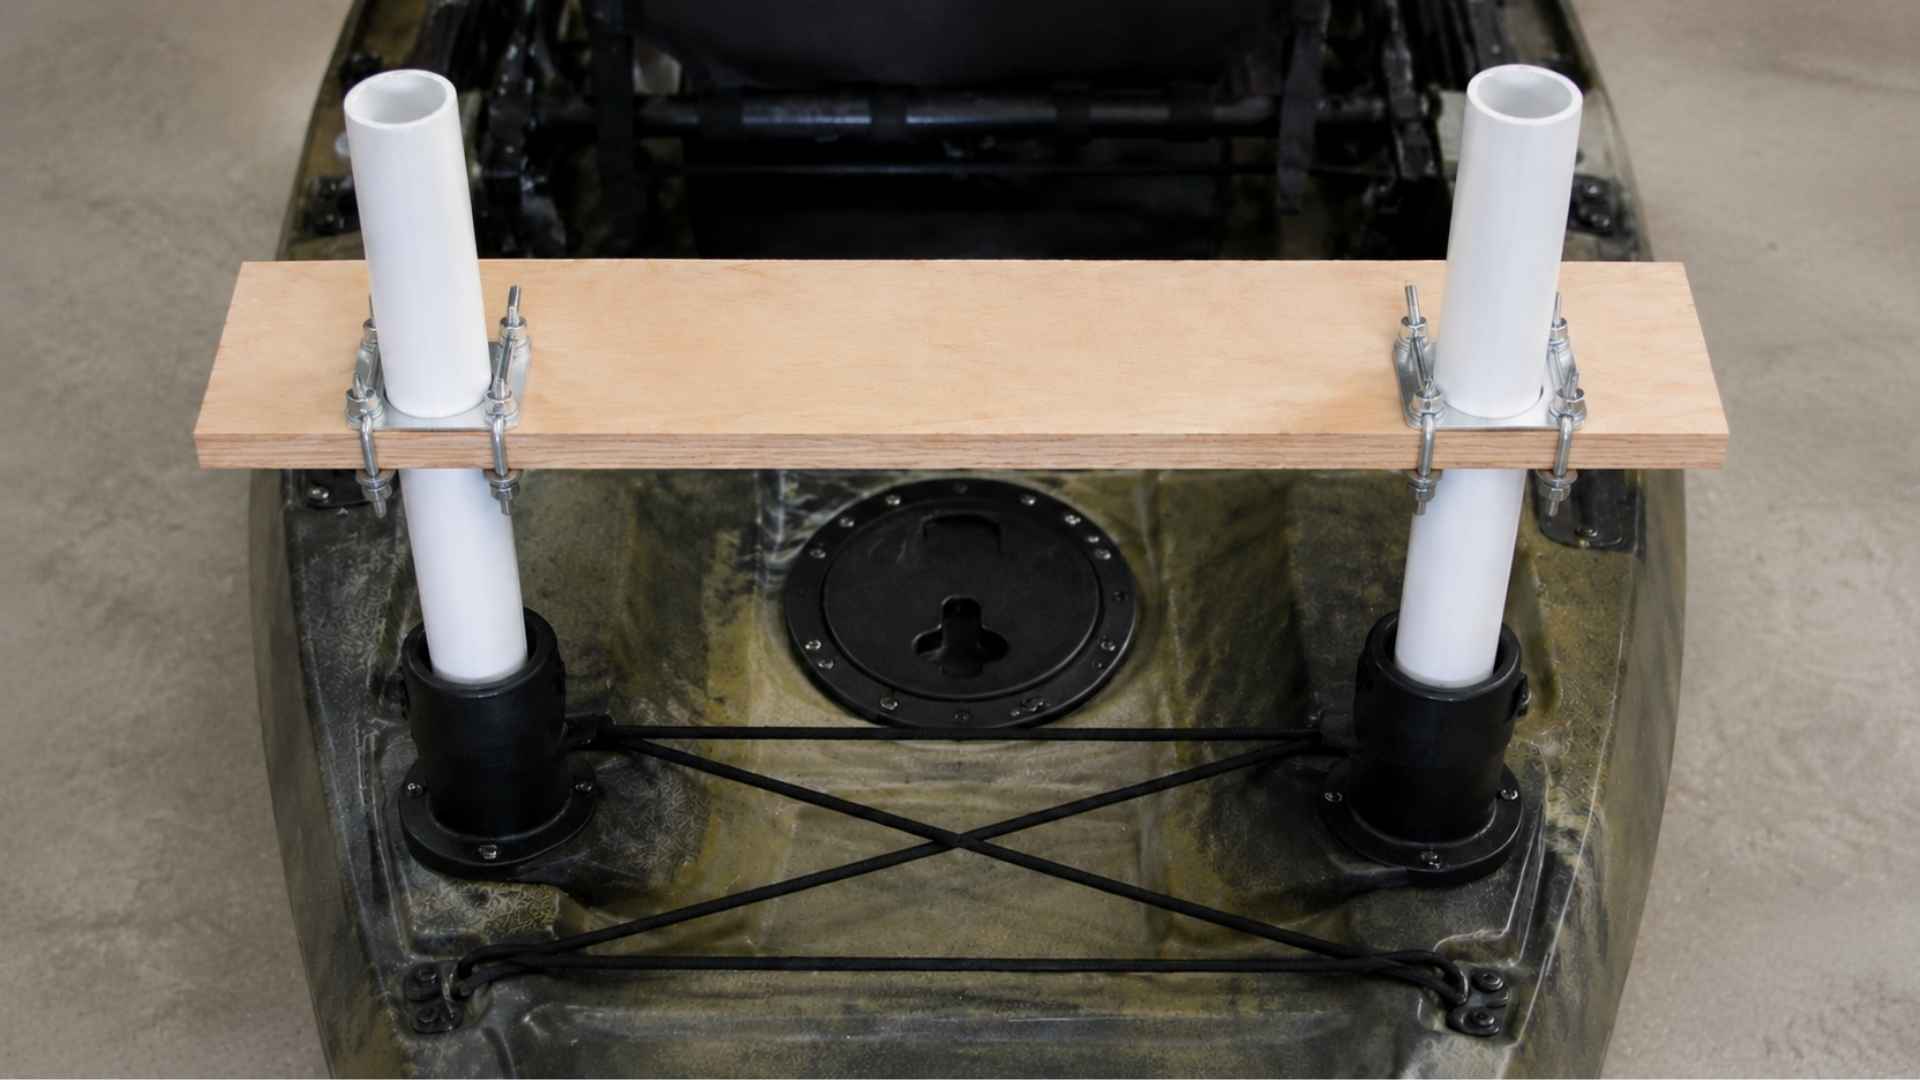
Drill two holes into each PVC pipe where the board will sit. Line up the board and screw it into place through these holes. Tighten each bolt firmly so the board does not shift once the motor is attached.
Check that the board sits level before moving to the final step.
Step 5: Mount the Trolling Motor
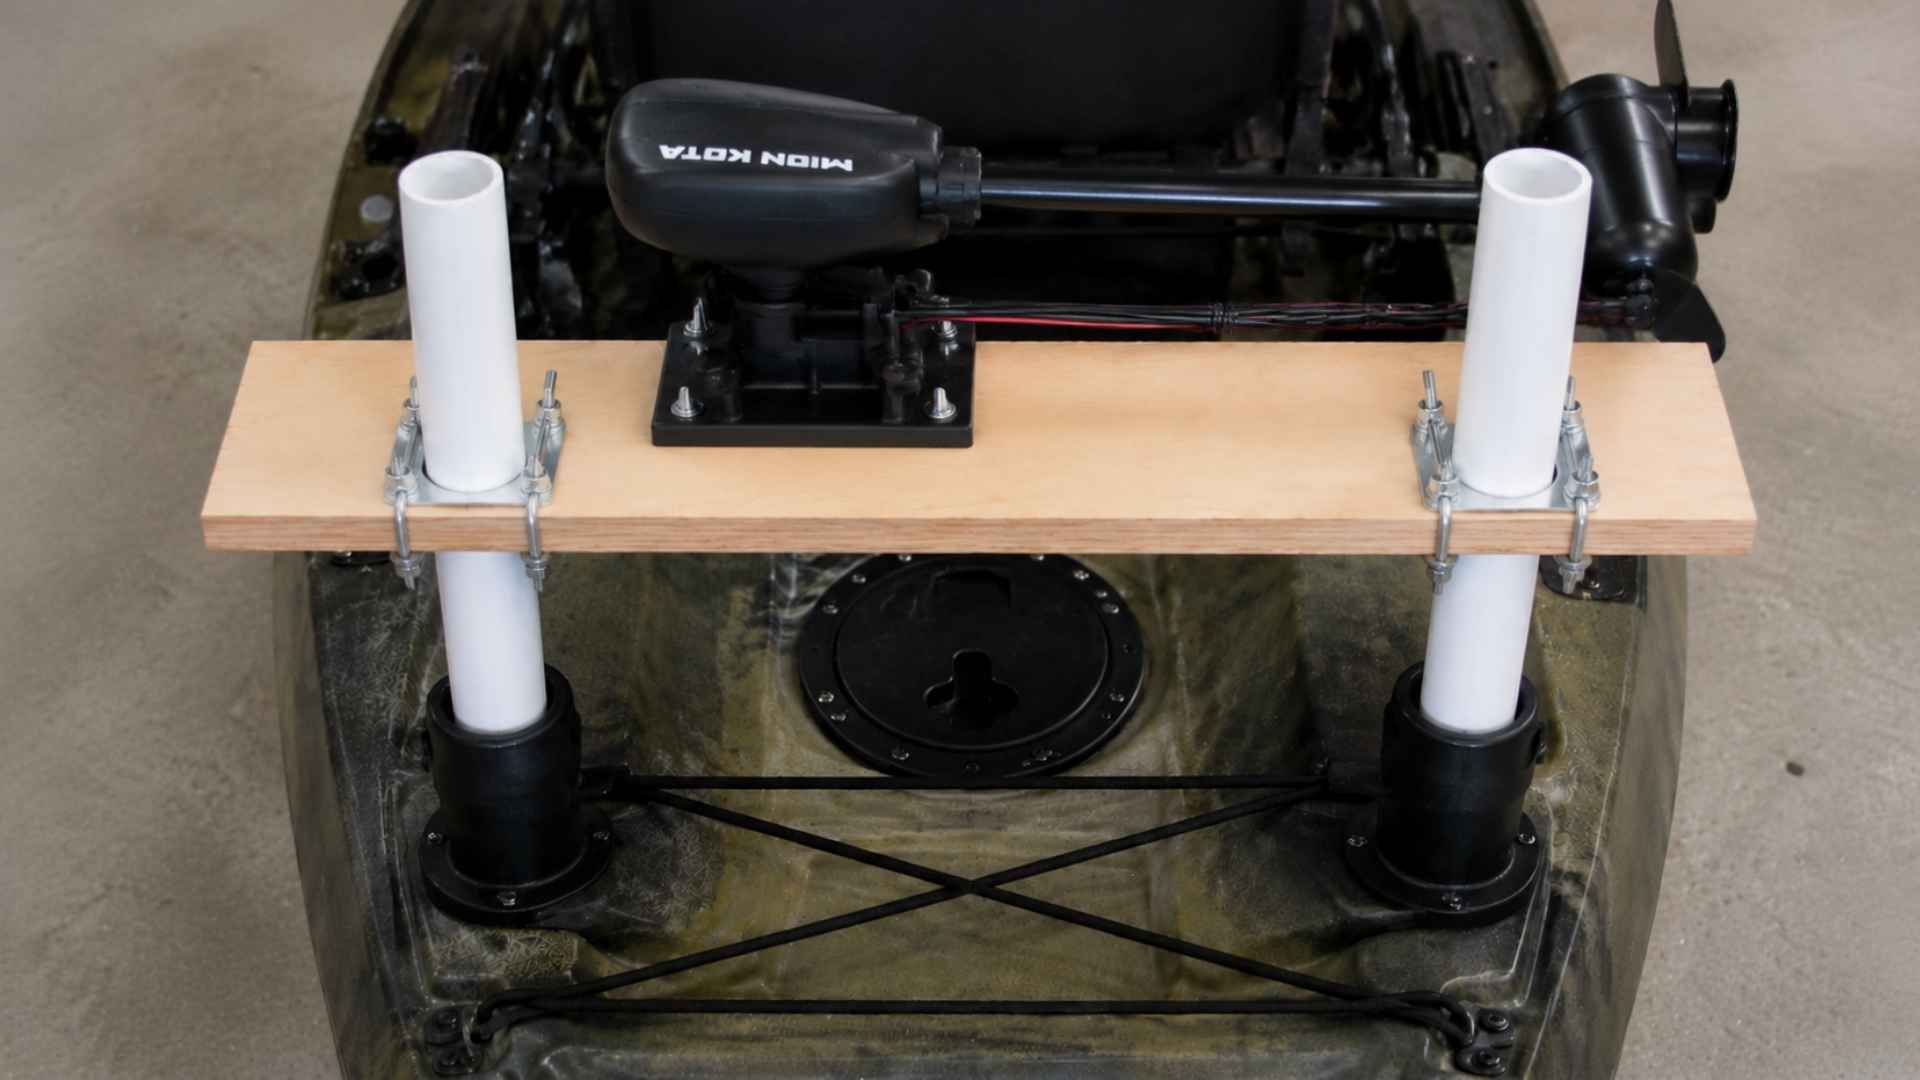
Attach your trolling motor to the finished board using its clamp or mounting bracket. Tighten all connections and check for any wobble. Test the setup on land first before heading to the water.
Once secure, your DIY kayak trolling motor mount is ready to use.
Tips to Make Your Mount Stronger and Safer
A few small adjustments can make your DIY trolling motor mount last longer and perform better. Keep these tips in mind before and during the build.
- Use lightweight materials: Choose light wood or aluminum to avoid adding extra weight that affects kayak balance.
- Add a waterproof coating: Seal wood parts with a waterproof coating to prevent swelling, rot, or water damage.
- Check weight capacity: Confirm your kayak’s weight limit before building, so the motor and mount do not overload it.
- Build at waist height: Set your kayak at waist height while building, so the motor clears the ground safely.
- Use marine-grade hardware: Pick rust-resistant bolts and screws, since regular hardware wears out fast in water.
Following these tips helps your mount handle regular use without breaking down. A little extra care now saves repair time later.
| Builders who have gone through this project often find that the second attempt fits better than the first, since it is hard to judge the exact pipe length until the kayak is in the water.
Test fitting the PVC before gluing anything saves a second trip to the hardware store. |
Side Mount vs Transom Mount
Choosing between a side mount and a transom mount depends on your kayak type and how you plan to use it. Both options have clear strengths.
| Feature | Side Mount | Transom Mount |
|---|---|---|
| Best for | Fishing and casting | Straight-line cruising |
| Stability | Easy casting access, but off-center weight can cause the kayak to veer and need correction | More stable, since the motor stays centered at the stern |
| Kayak size | Works well on wider kayaks | Better for longer, narrower kayaks |
| Steering | Easier turns while fishing | Simple forward and reverse control |
| Setup difficulty | Slightly more complex | Easier to install |
Side mounts suit anglers who want easy access to casting and do not mind occasional steering corrections. Transom mounts work better for paddlers who want centered weight and simple straight-line control.
How to Maintain Your DIY Trolling Motor Mount
Regular upkeep keeps your DIY trolling motor mount safe and working well. A few quick checks before and after each trip go a long way.
- Check bolts before every trip: Tighten all bolts and screws before heading out, since vibration loosens them over time.
- Clean off salt and debris: Rinse the mount with fresh water after saltwater use to prevent rust and buildup.
- Inspect for cracks or wear: Look over the board and pipes regularly for cracks, loose joints, or weak spots.
- Dry the mount fully: Let wooden parts air dry completely after each trip, and follow good kayak storage practices the rest of the season to avoid mold, rot, or swelling.
- Reapply waterproof coating: Refresh the waterproof coating on wood parts once or twice a season for lasting protection.
Simple maintenance habits help your mount last for many seasons. A few minutes of care now prevent bigger repairs later.
Is Your Motorized Kayak Legal on the Water?
Adding a trolling motor turns your kayak into a motorized vessel in most states. This usually means registering your kayak is required, along with the right type of life jacket for the water you paddle. Check the USCG Boating Safety site or your state’s Department of Natural Resources page before heading out.
Wrap Up
A DIY kayak trolling motor mount gives you a strong, custom setup without the high price tag of store-bought options. With basic materials like PVC pipe, plywood, and bolts, you can build a mount that fits your exact kayak in just a few hours.
Choosing between a side mount and a transom mount, following the safety tips, and keeping up with regular maintenance all help your build last for seasons of use.
Before you head out, remember to check your state’s registration and life jacket rules to stay legal on the water.
Ready to start building? Save this for your next workshop session, and share it with a fellow angler who paddles the same waters as you.
Frequently Asked Questions
How Long Does a Trolling Motor Battery Last on a Kayak?
Most kayak trolling motor batteries last 3 to 8 hours, depending on battery size, motor speed, and water conditions.
Can I Easily Remove and Reattach the Mount?
Yes, a bolted PVC mount comes off in minutes, making storage, transport, and switching between kayaks simple.
What Motor Shaft Size Works Best for a Diy Mount?
What motor shaft size works best for a DIY mount? Short shaft motors, generally between 24 and 36 inches, work best for kayaks. The right length depends on how high the mount sits above the waterline, so measure before buying.
Will a DIY Mount Work with Any Trolling Motor Brand?
Yes, most DIY mounts work with any brand, as long as the clamp size matches your board thickness.
How Fast Can a Kayak Go with a Trolling Motor?
Most kayaks with a trolling motor reach speeds of 3 to 5 miles per hour, depending on motor power.